
There’s something magical about the humble omelet. One moment, it’s just a few cracked eggs; the next, it transforms into a canvas for endless culinary creativity. The other day, while Tom and I were savoring a far-from-perfect but utterly delicious omelet (or omelette, depending on where you’re from) for lunch, he casually mentioned, “Have you ever heard of the Japanese omelet? Or Tamagoyaki?”
Of course, I hadn’t. Not until I became a self-proclaimed “omelet specialist”. But that simple question sparked a thought: the versatility of this dish deserves to be celebrated.
This post isn’t about chasing culinary perfection. It’s about discovering techniques, flavors, and styles that suit your unique rhythm in the kitchen—transforming eggs into something as joyful to make as it is to eat. Whether you’re a curious beginner or a seasoned cook, whether you create a polished masterpiece or a hearty, delicious mess, there’s something here for every omelet enthusiast.
So, let’s crack some eggs and get started!
The Basics of the Best Omelets
Before You Even Begin
Before you crack those eggs, let’s address the groundwork that ensures your omelet journey starts on the right foot. Without these essentials, your omelet dreams might end before they begin.
Whisk
It ensures even mixing of the eggs, helping to quickly incorporate air for a lighter texture while maintaining creaminess.
PRO TIPS:
- Both silicone and metal whisks are excellent options for omelets. Silicone whisks are perfect for non-stick pans as they prevent scratching, while metal whisks are sturdier and ideal for faster mixing.
- Electric whisks can also be used, but they risk overmixing, so use them with caution to maintain the creaminess of the eggs.
Non-stick skillet
An 8-10 inch (20-25 cm) skillet is ideal for individual omelets.
PRO TIP: Ensure the skillet is free of scratches and residue, as a clean, smooth surface prevents sticking and promotes even cooking. Omelets require a flawless non-stick surface to ensure easy flipping and folding. Even a slightly sticky pan can disrupt the process, making it difficult to achieve the desired texture.
SPECIALIZED PANS:
- Japanese Tamagoyaki Pans are rectangular pans specifically designed for rolling Japanese-style omelets, ensuring precise layers and a uniform shape.
- Double-Sided Omelet Pans feature hinged lids or dual compartments, allowing effortless flipping without the risk of breaking the omelet.
Spatula
Perfect for gentle folding without breaking the omelet. Choosing between a wooden or silicone spatula depends on personal preference. Both are ideal for non-stick pans, as they prevent scratching while providing firm support for folding.
ADVANCED UTENSILS:
- Offset spatula: Ideal for precise flipping and folding, offering better control during the cooking process.
- Wide-head spatula: Provides extra support for larger omelets, ensuring they hold their shape while being flipped or served.
When Eggs Hit the Bowl
Choosing the Right Eggs
Fresh eggs provide superior flavor and texture. Additionally, eggs from organic or free-range sources not only taste better but also tend to have brighter yolks and firmer whites, making them ideal for ensuring a perfect omelet texture.
PRO TIP: To test their freshness, place the egg in a bowl of cold water. If it sinks and lays flat, it’s fresh. If it stands upright or floats, it’s no longer fresh.
Preparing the Mixture for a Fluffy Omelette
1. Use 2-3 eggs per omelet for individual servings.
2. Gently beat the eggs until the yolks and whites are just combined and no visible streaks remain.
PRO TIP: Don’t overmix, as this incorporates excess air and can result in a rubbery, dense omelet. Lightly combining the eggs preserves their natural creaminess, ensuring the omelet turns out tender and fluffy after cooking.
3. Add a splash of milk or cream for a creamier consistency, but this is optional.
4. Season with salt and pepper.
PRO TIPS:
- Add salt at the beginning for creamier, more tender omelets, as it helps retain moisture in the eggs.
- Adding salt at the end results in a slightly firmer texture, allowing for more control over the final taste.
- Herbs like chives or parsley can add a fresh touch. Add herbs before cooking for an infused flavor throughout the omelet, or sprinkle them on top after cooking for a burst of freshness.
Pouring with Precision
Pour the mixture into the preheated skillet based on your chosen style of omelet. Make sure the pan is adequately preheated—this ensures the eggs begin setting immediately upon contact. Proper preheating prevents sticking, promotes even cooking, and creates a smooth, consistent texture throughout the omelet.
PRO TIP: To test if the skillet is ready, sprinkle a few drops of water onto the surface—if they sizzle and evaporate quickly, the pan is hot enough.
Techniques by Style
Each style of omelet brings its own unique charm, flavors, and preparation techniques. Whether you’re drawn to the creamy folds of the French omelette or the crispy edges of Thai Khai Chiao, exploring these techniques is as much about mastering a skill as it is about celebrating diverse culinary traditions. Explore the rich world of omelet-making styles and uncover what makes each one special.
Omelette Française

Technique: Start with a non-stick pan over low heat, adding 1-2 teaspoons (5-10 grams) of butter for a smooth base. Pour in the beaten eggs and immediately stir gently with a silicone spatula, moving the mixture from the edges toward the center. This technique helps create tiny curds while keeping the omelette creamy. Once the eggs are just set but still slightly runny, tilt the pan and use the spatula to fold the omelette into a neat, smooth envelope. Avoid browning the surface to preserve its signature golden-yellow appearance.
PRO TIP: Use a generous amount of butter and keep the heat low to avoid overcooking. Moderate heat gives you more control, ensuring a soft, creamy texture and preventing the eggs from browning too quickly.
American Omelet

Technique: Begin by heating a non-stick pan over medium heat and adding a small amount of butter or oil. Pour the beaten eggs into the pan and allow them to set slightly without stirring. Add your chosen fillings, such as cheese, vegetables, or ham, to one side of the omelet. Once the edges start to lift easily and the bottom is golden brown, use a spatula to carefully fold the omelet in half or thirds, encasing the fillings inside.
PRO TIPS:
- Cooking over medium heat ensures a fluffy interior and prevents the outside from overbrowning.
- Avoid overloading with fillings to maintain the omelet’s structure and make flipping easier.
Japanese Omelet (Japanese Omelette or Tamagoyaki)

Technique: Begin with a rectangular tamagoyaki pan over medium-low heat, brushing it lightly with oil. Pour a thin layer of the egg mixture into the pan and allow it to set slightly. Roll the cooked layer toward one side of the pan using a silicone spatula or chopsticks. Brush the exposed surface with a bit more oil, then pour another thin layer of egg, lifting the rolled portion to allow the new mixture to flow underneath. Repeat until all the egg mixture is used to form a neatly rolled omelet, ensuring consistency in shape and texture.
PRO TIPS:
- Maintain consistent heat and oil the pan lightly between layers to prevent sticking and achieve smooth, even rolls.
- Add soy sauce, mirin, and a pinch of sugar to the eggs for a traditional flavor. For extra texture and taste, mix in finely chopped scallions, shredded nori, or grated carrots. Lightly oiling the pan between layers prevents sticking and ensures smooth, even rolls.
Spain Omelette (Spanish Omelette or Tortilla Española)

Technique: Start by peeling and slicing potatoes and onions into thin, uniform pieces. Heat a generous amount of olive oil in a non-stick or well-seasoned pan over medium heat. Add the potatoes and onions, cooking them slowly until tender but not browned. Drain excess oil, then mix the cooked vegetables with beaten eggs in a large bowl, ensuring an even coating. Pour the mixture back into the pan over low heat and cook until the edges set. To flip the tortilla, place a plate over the pan, invert it carefully, and slide the tortilla back into the pan to cook the other side until fully set.
PRO TIPS:
- Use medium-low heat to prevent burning and ensure the tortilla cooks evenly.
- A well-drained mixture avoids excess oil, making it easier to handle during flipping.
- Letting the tortilla rest briefly after cooking enhances its flavor and texture.
Fritatta (Italian Fritatta)

Technique: Similar to an omelet but thicker and baked to perfection. Start by cooking ingredients like vegetables, cheese, or meat in an oven-safe skillet over medium heat. Once softened, add the beaten eggs and let them cook gently without stirring. Transfer the skillet to a preheated oven to finish cooking, ensuring the top is set and slightly golden.
PRO TIPS:
- Use medium-low heat on the stovetop to avoid browning the bottom before baking.
- A well-seasoned cast iron or non-stick skillet is ideal for even cooking and easy release.
Indian Masala Omelette

Technique: This vibrant, spiced omelet is a breakfast staple in many Indian households. Begin by whisking eggs with turmeric, chili powder, and a pinch of salt for bold flavor and color. Mix in finely chopped onions, tomatoes, green chilies, and fresh coriander leaves to add texture and freshness. Heat a tablespoon of oil in a skillet over medium heat and pour in the egg mixture, spreading it evenly. Let it cook until the edges set, then gently flip and cook the other side until golden.
PRO TIP: Serve your masala omelet hot with buttered toast or parathas for a hearty breakfast. For added richness, sprinkle grated cheese or drizzle with a touch of cream before serving.
Thai Khai Chiao

Technique: Known for its crispy texture and savory flavor, this Thai-style omelet is a unique variation that is deep-fried. Begin by whisking eggs vigorously with a splash of fish sauce and a pinch of white pepper to aerate the mixture. Heat a generous amount of oil in a wok or deep skillet over high heat until shimmering. Pour the egg mixture into the hot oil in one swift motion, allowing it to puff up and crisp around the edges. Cook until golden brown, flipping once for even frying.
PRO TIP: Use a wok for the best results, as its shape allows the omelet to fry evenly and puff up beautifully. Serve immediately over steamed jasmine rice with a side of chili sauce for an authentic Thai experience.
Korean Gyeran Mari

Technique: This Korean-style rolled omelet is a beautifully layered dish often filled with finely chopped vegetables, ham, or cheese. Begin by whisking eggs with a pinch of salt and pepper. Heat a rectangular or non-stick pan over low-medium heat, lightly greased with oil. Pour a thin layer of the egg mixture into the pan, letting it set partially before sprinkling fillings evenly across the surface. Gently roll the omelet toward one side, then push the roll back to the starting position. Add another thin layer of egg mixture, lifting the roll slightly to allow the liquid to flow underneath. Repeat this process until all the egg mixture is used, forming a thick, neatly rolled omelet.
PRO TIPS:
- Use consistent low heat to avoid browning and keep the layers tender.
- For clean, even slices, allow the rolled omelet to cool slightly before cutting it into bite-sized pieces.
Iranian Kuku Sabzi
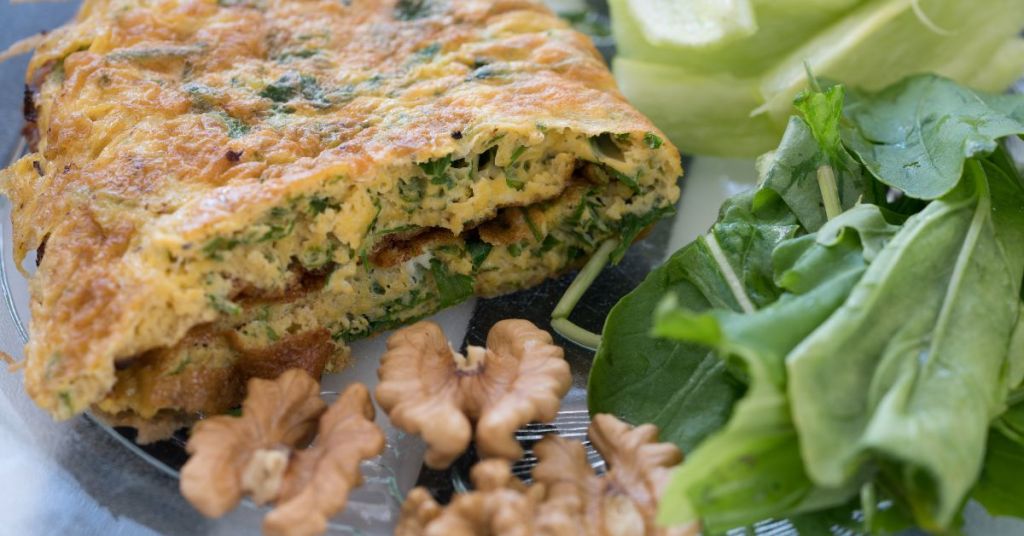
Technique: This Persian omelet is rich in fresh herbs and packed with flavor. Begin by whisking eggs with a generous amount of finely chopped herbs such as parsley, cilantro, dill, and chives. Add a pinch of turmeric for color and a subtle earthy taste. Heat oil in a non-stick or cast-iron skillet over medium heat, then pour in the mixture. Allow it to set slightly before transferring the skillet to a preheated oven to finish cooking. The result is a dense and fragrant dish that pairs beautifully with flatbread or yogurt.
PRO TIP: For an authentic touch, use barberries or walnuts as an optional garnish before baking, adding bursts of tartness and crunch. with fresh herbs and baked for a dense, flavorful dish.
Common Mistakes to Avoid When Making the Perfect Omelet
Even the simplest recipes can go wrong without the right techniques. Avoiding these common mistakes will ensure your omelet turns out light, fluffy, and delicious every time.
Overbeating the Eggs
It’s tempting to whisk the eggs vigorously for a fluffier omelet, but overbeating introduces too much air, leading to a dense and spongy texture once cooked. For the best results, whisk the eggs just until the yolks and whites are combined, with no streaks visible.
Using High Heat
Cooking an omelet on high heat might seem like a shortcut, but it can result in overcooked, rubbery eggs. High heat can also cause uneven cooking, with the outside browning too quickly while the inside remains undercooked. Instead, opt for medium to low heat. This allows the eggs to cook gently and evenly, giving your omelet that soft, velvety texture.
Skipping the Preheat
A properly preheated skillet is key to a perfect omelet. If the pan isn’t hot enough, the eggs can stick, leading to a frustrating cleanup and a less-than-ideal presentation. Preheat the skillet for a minute or two over medium heat before adding butter or oil, ensuring a smooth surface for your omelet to glide over.
Flipping or Folding Too Early
Patience is crucial when making an omelet. Flipping or folding the omelet before it has set can cause it to tear or break apart. Wait until the edges are firm and the surface is mostly set but still slightly glossy. At this stage, folding or flipping will be much easier and will result in a clean, professional finish.
Advanced Techniques and Variations to Perfect Your Omelet Game
Once you’ve mastered the basics of omelet-making, it’s time to level up. These advanced techniques and creative variations will inspire you to experiment and elevate your omelet to gourmet status.
Reheating and Releasing
- Smooth Release from the Skillet: To ensure your omelet releases seamlessly, coat the skillet lightly with oil or butter. A non-stick pan is ideal, but even cast iron can work beautifully with proper seasoning and lubrication. Tilt and swirl the pan to distribute the fat evenly before pouring in the egg mixture.
- Reheating Without Compromise: Reheated omelets can lose their texture if not handled properly. Avoid microwaving, as it often overcooks the eggs and dries them out. Instead, use a low-temperature oven (around 150°C/300°F) to gently warm the omelet while maintaining its moist and tender consistency. Wrap it in foil to trap steam and prevent it from drying out.
Creative Flavors to Expand Your Palette
- Global Spice Blends: Take your omelet on a world tour by incorporating unique seasonings. Try:
- Za’atar: A Middle Eastern blend of thyme, sesame, and sumac for an herby, tangy twist.
- Curry Powder: Add depth and warmth with Indian-inspired flavors. Pair it with sautéed onions and bell peppers.
- Herbes de Provence: A French classic with lavender and rosemary for a sophisticated aroma.
- Unexpected Fillings: Move beyond the usual ham-and-cheese combo with these exciting additions:
- Smoked Salmon and Cream Cheese: A luxurious pairing perfect for brunch.
- Truffle Oil: Drizzle over the finished omelet for an earthy, umami-packed experience.
- Roasted Garlic and Spinach: A balance of bold and healthy flavors that pairs well with creamy cheeses like goat cheese.
Healthier Options Without Sacrificing Flavor

- Egg White Omelets: For a low-calorie, protein-rich alternative, separate the yolks and whip the whites until frothy. Add fresh herbs like parsley or chives to enhance the flavor.
- Low-Carb Fillings: Avoid carb-heavy ingredients like potatoes or bread. Instead, opt for high-protein and nutrient-dense options like:
- Grilled Chicken or Shrimp: Adds satisfying texture and flavor.
- Tofu or Tempeh Crumbles: Perfect for a vegetarian or vegan twist.
- Avocado and Salsa: A creamy, refreshing option with a Mexican flair.
Mastering Folding Techniques
- The Classic Fold: Achieve a traditional French or American-style omelet by tilting the pan while gently folding the omelet into a half-moon shape. Use a silicone spatula for precision and to avoid tearing.
- Rolled Perfection: For Japanese tamagoyaki or Korean gyeran mari, cook thin layers of egg in stages. Roll tightly after each addition for a layered, elegant texture. This technique is ideal for sweet or savory variations.
- No-Fold Omelets: For rustic frittatas or Spanish tortillas, skip the folding entirely. Pour the egg mixture into an oven-safe pan, add your fillings, and bake until set. The result is a hearty, sliceable dish perfect for sharing.
Professional-Level Presentation
- Restaurant-Worthy Garnishes:
- Finish with a sprinkle of microgreens, edible flowers, or finely chopped chives for a polished look.
- Drizzle flavored oils, such as chili or basil oil, in an artful pattern around the plate for added visual appeal.
- Precision Shaping: Use a ring mold to create perfectly round omelets or to neatly stack layers of fillings inside. This technique works particularly well for individual servings at formal gatherings.
Tips for Consistency
- Temperature Control: Maintaining the skillet at the optimal temperature (160-180°C / 320-356°F) is crucial for even cooking. Use a kitchen thermometer to avoid overheating or uneven results.
- Resting for Perfection: Allow the cooked omelet to rest for 1-2 minutes before slicing. This resting period helps flavors meld and ensures the structure holds when served.
FAQs About Omelets
Q: Are omelets and scrambled eggs the same?
A: No, they are quite different in preparation and texture. Omelets are cooked flat without stirring, allowing the eggs to set into a cohesive layer that is folded over fillings. Scrambled eggs, on the other hand, are stirred continuously as they cook, creating a fluffy, broken texture. The difference lies not only in the technique but also in the way they’re served, with omelets often folded around ingredients for a more structured presentation.
Q: How do I prevent my omelet from sticking to the pan?
A: The key to a non-stick omelet lies in preparation and technique:
- Use the right skillet: A non-stick or well-seasoned cast iron skillet is ideal.
- Preheat properly: Allow the skillet to warm up over medium heat before adding fat. This ensures even cooking and reduces sticking.
- Add enough oil or butter: Coat the pan lightly but thoroughly, swirling it around to ensure the entire surface is covered. This creates a barrier between the eggs and the pan.
For an extra layer of security, you can also use a silicone spatula to loosen the edges gently as the omelet cooks.
Q: Can I make an omelet without milk?
A: Absolutely! Milk is not essential for making an omelet. Simply beat the eggs thoroughly until the yolks and whites are well combined, then season with salt and pepper. Milk can add a touch of creaminess and fluffiness, but leaving it out creates a pure egg flavor and a firmer texture. For those seeking a creamier result without dairy, alternatives like almond milk or oat milk can also be used.
Q: What’s the best pan size for an omelet?
A: The ideal skillet size depends on the portion you’re making:
- For a single-serving omelet, a 20-25 cm (8-10 inch) skillet is perfect. It provides enough space for the eggs to spread out evenly while maintaining a manageable thickness.
- If you’re cooking for multiple people, consider a larger skillet (around 30 cm or 12 inches) or making individual omelets for better control over consistency and presentation.
Keep in mind that a pan that’s too large can result in an overly thin, fragile omelet, while one that’s too small may lead to uneven cooking.
Q: How can I make my omelet fluffier?
A: Whisk the eggs lightly to avoid toughening the proteins. Cook over medium-low heat, and cover the pan briefly to trap steam for a light, fluffy texture. Adding a splash of water can also help create airiness.
Q: What are some good substitutes for butter or oil?
A: If you’re looking to reduce fat or explore alternative flavors, try these substitutes:
- Cooking spray: Keeps calories low while preventing sticking.
- Broth or stock: Adds flavor and moisture without added fat.
- Coconut oil or ghee: Imparts a unique, slightly sweet or nutty flavor to the omelet.
- Avocado or mashed banana: Spread a thin layer on the pan for a creative twist, although this works best for non-savory omelets.
Q: Can I make omelets in advance?
Q: Can I make omelets in advance?
A: Yes, omelets can be made ahead of time and stored for later. Allow them to cool completely, then wrap tightly in plastic wrap or store in an airtight container in the refrigerator for up to 2 days. Reheat gently in a low-temperature oven, wrapped in foil to retain moisture. For the freshest results, prepare the fillings in advance and cook the eggs fresh.
The Final Flip
Mastering the art of omelet making is a rewarding journey that combines technique and creativity. This versatile dish can be so much more than a simple meal—it’s a blank canvas for culinary expression, perfect for breakfast, brunch, lunch, or even a light dinner.
With the advanced techniques and bold variations we’ve explored, we have the tools to transform eggs into a gourmet masterpiece. From experimenting with global flavors to refining your presentation and embracing healthier options, every omelet you create is an opportunity to showcase your skills and creativity.
If you’ve ever wondered about the science behind the perfect omelet, this video explanation dives into the fascinating chemistry of eggs and heat, helping you refine your technique even further.
Whether for a quick snack or an elegant centerpiece, the perfect omelet is always within reach—just waiting to be created in your kitchen!